Google Reader to Bloglovin

Sunday, June 30, 2013


Just a quick post to say thank you for all the support, especially through your comments and sweet emails. As you may have heard, Google Reader is shutting down tomorrow. I actually had no idea what Google Reader was because I have been using Bloglovin’ to keep up with all my favorite blogs on my iPhone. Below is the link to reach my blog and to search for your other favorite blogs. 
Thank you again for your support! 
See you on Bloglovin!


Green Silk Dress

Saturday, June 29, 2013


Halston Heritage Dress: Plato's Closet ($12)
Nude Heels: Plato's Closet
DIY Clutch 
Belt: Target ($6)


Our favorite table- fresh donuts!


I was SO honored to be included with a few other lovely bloggers to put together a look for San Francisco Magazine’s Best of the Bay Area party. Once I found out about this opportunity, I knew immediately what outfit I would wear! I stayed true to my budget roots and I decided on a gorgeous Haltson Heritage dress (scored for only $12) that was not only bright and festive, but had just enough movement in the skirt, making it perfect for a night of dancing. I wanted to showcase the dress so I kept my accessories simple with gold-accented jewelry and nude heels, but added a little pizzazz with a beaded belt and another DIY clutch. I used a fabric that featured the same green from my dress, but in a tropical summer print.
I had the best time at the Best of the Bay Area event! There was tons of amazing food, lots of delicious drinks, and great views of the city. It truly was an incredible evening.


Restyled Moravian Star

Monday, June 24, 2013


A few months back, my birthday to be exact, I came across this punched metal star on the side of the road. The star was completely covered in rust, spider webs, and a fake snow from the Christmas tree lot, but I knew it had such beautiful potential and just needed a little love. Pictured below was a star I had originally intended to save up for to hang in our bedroom. Needless to say, I was overjoyed to find a free one that just needed a bit of work. I saw it as a little birthday luck!


Glass stars available here and here 


Supplies:
-metal Star
-Rust-Oleum spray paint in Hammered Copper from Lowes
-slated sandpaper brick
-chain to hang star *not pictured
-gummy bears for fuel

 The sandpaper brick was a huge help for the million corners and points on the star. 
I sanded the rust off each edge for a smoother finish and an easier paint application


 Next, I sprayed the first layer. 
I kept the spray paint about a foot back doing a light misting motion, making sure to hit all the corners and edges without applying too thick of a paint layer. When spray painting, patience is the best tip! Doing it too quickly can result in a patchy paint job or even worse- drip marks! 
I waited about an hour then applied another paint layer. I also spray painted a random chain we had from a different chandelier to use to hang the star. 

Finished! The beautiful metallic star was the perfect addition to our bedroom. 
Best part- this project cost less than $10!


Sequined Chevron Mini

Monday, June 17, 2013


Blouse: Plato's Closet ($9)
Sequined Mini: Marshalls
Chinese Laundry Heels: Plato's Closet ($11) 
Vintage Givenchy Clutch: Thrifted 


If you follow me on Instagram (@FrancescaPenko) you might recognize my outfit. I wore this to my cousin's beautiful wedding last weekend; my inspiration came from my Summer Wedding look-book I put together for this blog post. I opted for a bright, chevron skirt and kept the rest of my look neutral. This outfit was the perfect burst of color and comfortable enough to dance the whole night!

Thank you SO much to everyone who watched my YouTube video and left all the positive feedback. It was something I was super nervous to upload and share, so I was blown away by the amazing response. I appreciate each and every comment- looking forward to uploading my next video!

If you haven't seen my thrift haul, you can check it out here


Thank you for reading!


Thrift Store Haul

Monday, June 10, 2013


I started a YouTube channel to share some of my Thrift Store finds. Sometimes certain purchases don't get featured on my blog, so I decided to film a haul from last week's scores.
 Excuse my awkwardness!

Thanks so much for reading/watching!

DIY Zippered Clutch

Thursday, June 6, 2013


DIY Zippered Clutch


Supplies

Fabric- I purchased discount upholstery fabric for a thicker clutch (1/3 yard for $1.30)
Zipper- I used a 14 inch exposed zipper in the color Parakeet ($1.99)
Sewing machine or needle and thread to sew by hand
Pins
Scissors
Optional- clutch bag to trace fabric for desired clutch size


1. I traced my clutch, leaving about an inch extra on each side for the seam


2. With the fabric print side up, pin the zipper, face down. 
 It took me a few times to get the seam correctly, so play around with it before sewing into place. Sewing it this way ensures the raw sides of the fabric are hidden and it leaves a clean line.
It should look like the photo below when sewn.


3. Before sewing both zippered sides, I made sure to unzip the zipper to make sure there were no complications when I turned it right-side out.


4. Next, turn fabric so the print sides are touching


5. Pin the rest of the way around the clutch where you plan on sewing. 
I pinned about an inch in where I wanted my seam to be.


6. Sew around the remaining length. I used a zig zag stitch and tucked the zippered edges in.


Turn right-side out and done! 
A bright, summer clutch for less than $5. Can't beat that!


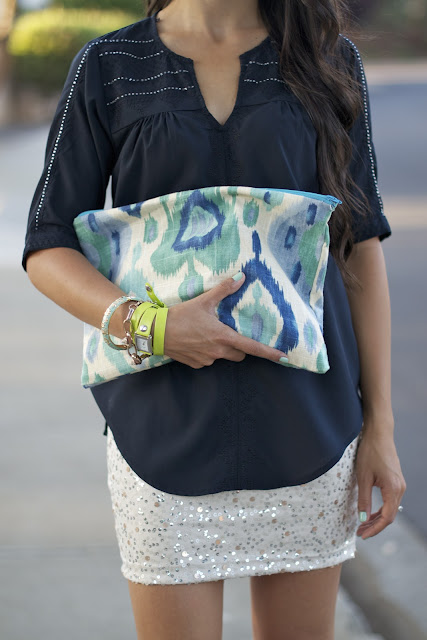
Sequin Mini: H&M ($15) (similar here)
MM Couture Blouse: Plato's Closet ($11)
Heels: Plato's Closet ($11) (also here)
DIY Clutch


 I would say I’m a pretty experienced sewer, but there is one specific thing that has always been intimidating to me- zippers. If there were a project involving one, I would either skip it or choose an alternative method. But today I conquered my fear of zippers by doing a project where a zipper was necessary. I made a cute zippered clutch, in a fun printed fabric, scored on mega sale. I was planning on making pillows, but I decided the fabric was too beautiful to be tucked away in a room! It needed to be celebrated, and by celebrated I mean made into a lovely statement bag for the whole world to see.
 This project was WAY easier than I had expected and only took about 20 minutes. I think I will be making/carrying many more clutches in the near future.


I couldn’t wait to use this clutch so I planned my outfit around it. I wore a navy blouse with Aztec embroidery and beading on it to keep with the colors in the clutch. I thought the navy blouse really made the colors on the bag pop and complimented the pattern beautifully. I dressed up my look with a little daytime sparkle on my skirt and some strappy nude sandals. 

Good luck and thank you so much for reading!